
Occasionally I go down a rabbit hole on the internet of looking at old, out of print drawing instruction books — out of mere curiosity about how familiar or unfamiliar their techniques are. The shift in tone in the language is the biggest shift — the techniques largely the same, more or less. But once or twice I’ve stumbled into something that seems very close, but not quite the same as intercross. I’ll post more here if I find them but for now here are a couple examples, some from older and some from newer sources.


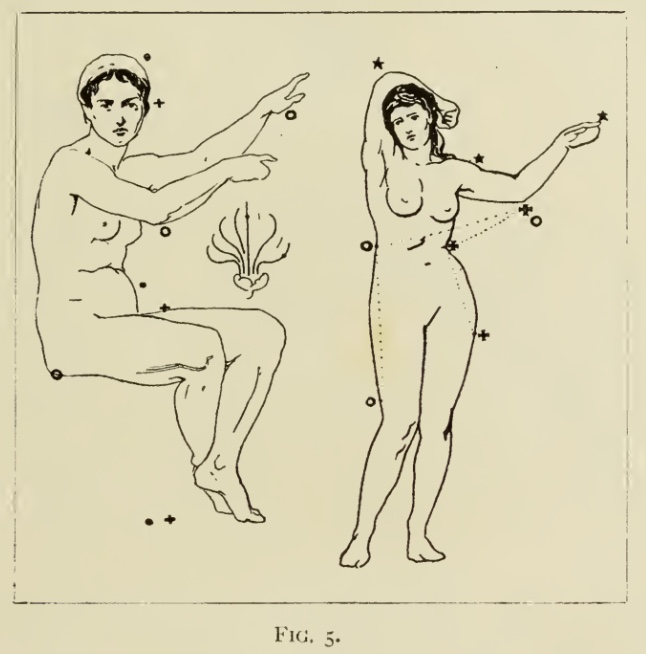
About Figure 5 above, the book, Figure Drawing and Composition by Richard Hatton, goes on to say “The draughtsman will see that the centre from the top of the head to the end of the foot is about the centre of the abdomen, as is indicated by dots. Then the height of the line of the thigh from the ground, marked by crosses, repeats at the eye. Then the distance from the seat marked by a ring to the elbow, repeats at the thumb. The same system may be followed down to the smallest detail.”

And the same book discusses Figure 8 (above) and Figure 9 (below) as follows, “Another way of securing proportion is by taking slanting lines connecting prominent points, as is shown in Fig. 8. Somewhat in the same way as in the geometrical problem, the angles being equal, the figures are equal. In Fig. 9 two methods of starting are shown. In A the head is drawn first and the forms radiate from it. In B the first line drawn was the slanting line through the elbows to the foot, as base ; then the two other sides of the triangle giving the knee. Then one elbow is seen to occupy about the centre of the base-line, which thus becomes divided into two halves. In the left of these the head occurs a little to the outside of the centre. These methods of finding centres and employing slanting lines may be used in drawing from imagination, for it is of very little use one drawing out of one’s head if one does not see the figure lying on the paper almost as if it were verily present there. It only needs marking over.

Another slightly newer book which features something very similar but not quite the same as intercross is Drawing: Space, Form, Expression by Melody Peters and Wayne Enstice. Below you can see an illustration and read the accompanying text below describing the process of Angling or Triangulation

ANGLING BETWEEN SPATIAL POINTS
The method just described for angling linear elements in your subject may also be used to measure the degree of angle formed by any two points in your visual field.
First, select two easily distinguished points in the space before you (such as, the corner of a table and the center of a clock). Next, angle these two points with your pencil (taking care not to point through the picture plane) and transfer
that angle on to your drawing.
TRIANGULATION
Angling between a set of three points on the picture plane can be an invaluable aid in correctly positioning your overall image on the page. To triangulate, you will angle first between two points and then angle from these two points in order to locate the third.
The procedure for triangulation is outlined in Fig. 3-6. When you have
followed this procedure, and if you have angled accurately, you will have established three widely spaced points in your drawing. You may then proceed to find other points
TIPS ON TRIANGULATION
- Always look for the largest possible triangle of points within your subject matter. The closer the points come to filling up your format the more valuable the triangle will be in setting up your entire image.
- Always try to find a roughly equilateral triangle. If your triangle is made of obtuse and very acute angles, any error in your angling will throw off your proportions. If all legs of the triangle are about the same length, a slight miscalculation of angle will not make much difference.
- If your pencil is not long enough to angle between the two desired points, you have two options: (a) Find something longer to angle with, such as a ruler or yardstick; (b) Hold the pencil closer to your eyes.
- If you have great difficulty in picking up the technique of angling, try using the edge of a broad ruler or plastic triangle in lieu of a pencil. The plane of the ruler or triangle will remind you where your picture plane is so that you will have less of a tendency to point through it.

